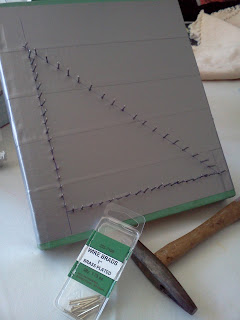
One of the easiest and cheapest ways to build a triangle loom is to make it out of a book. Really! Here is what you will need:
Supplies
- A hard-bound book that you really, really never want to open or read again. It should be at least 1/2 inch thick and as large as possible.
- Brads (small nails) 3/4 inch to 1 inch long. Try to get brads that don't have a lot of rough metal edges, if possible. At least 100 of these.
- Duct tape or packaging tape
- Graph paper (1/4 inch grid or smaller, make sure the grids are squares, not rectangles)
Tools
- Hammer (smaller is better)
- Ruler
- Pen, pencil or marker
The Process
- Using your duct or packing tape, tape the book closed. Go across the front cover, over the pages, across the back cover and over the spine. Cut the tape and position another strip of tape next to the first one so the book will be totally taped closed and cannot be opened. You can tape in one direction or both directions. Cover the entire surface of the covers of the book with tape, getting it as smooth and neat as possible.
- Trim the graph paper so it will fit on the surface of your book and tape it carefully onto one of the covers of the book. making sure that the grid on the graph paper aligns with the edges of the book. You can either attach the paper so it will remain on the book permanently, or you can remove it after you have used it to position your nails.
- Make sure you understand the theory of nail placement on a triangle loom.
- Draw the triangle shape on your graph paper. Use the graph paper to align your right triangle corner. Your other two corners will be 45 degree angles. ( A diagonal across the grid of the graph paper will be a 45 degree angle.) Remember that your two short legs must be the same length. See photo 1 below.
- Graph paper comes in all sorts of different grid sizes. Using the grid, position the nails on the two short legs of the triangle to be 1/4 to 1/2 inch apart, then follow the grid across to the long leg of the triangle and mark the corresponding nail position on the long leg. Count the marks you have made to be sure you have the same number of nails on each side. Do not count the nails at the corners.
- Hammer nails into all the marked locations, including the two 45 degree corners of the triangle. Do not hammer a nail into the 90 degree angle corner. Try to hammer the nails as straight as you can and get the depth of the nails even. You will want to have about 1/2 inch of each nail sticking out of the book. See photo 2 below.
Note: Here is a link to a video showing construction of a square loom using a book as the base. Same technique, different shape. http://www.youtube.com/watch?v=NHkeoNB34yo
 |
| Photo 1: Book covered with duct tape, graph paper taped on top. |
That's it. You are ready to start weaving!!!

No comments:
Post a Comment